Wedding dress - Lace bodice
The lace overlay bodice was the part of my wedding dress that worried me the most as it was the part that could so easily go wrong! In addition, we didn't have a plan for it until we got the lace. The reason for this is because we wanted to check the character of the fabric and also work out how to show it off to its full potential.

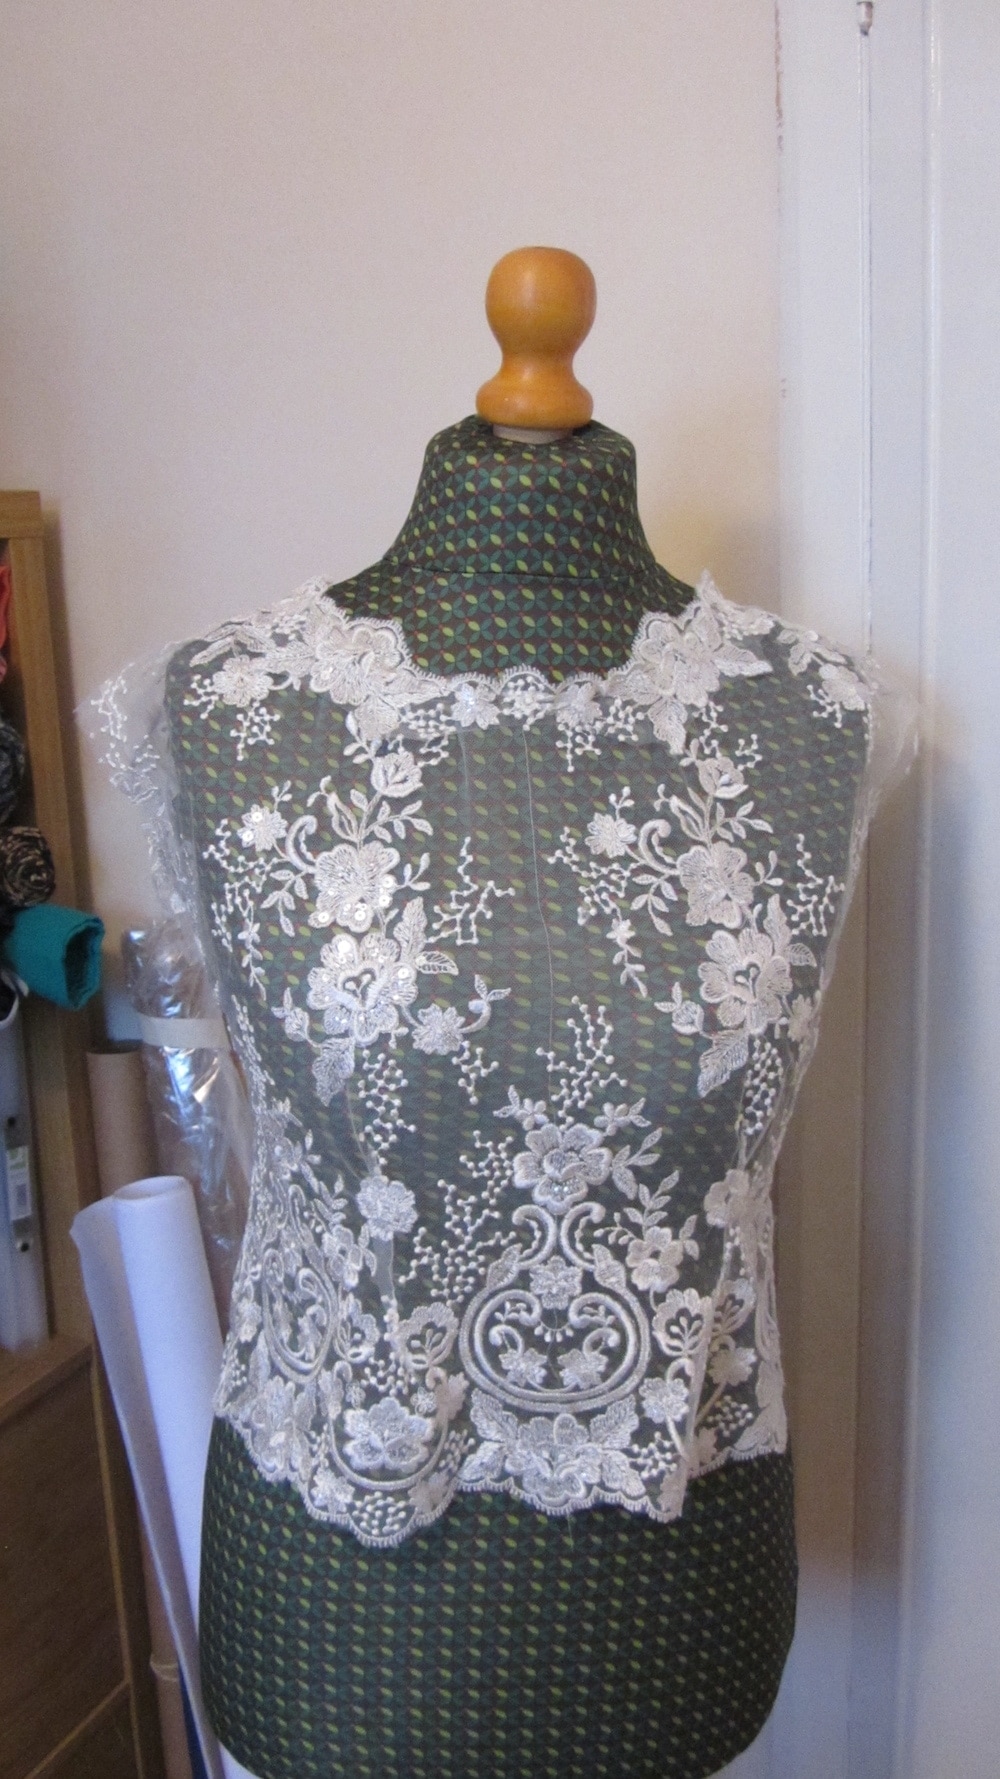
The Shelley lace is a wonderful ivory lace comprised of a tulle base, which has been embroidered with a rich, lustrous thread to form the floral design and is finished with a light dusting of sequins. The edges of the flowers and leaves are subtly edged with a silver thread and the lace has matching scalloped edges on both sides. The tulle base makes it delicate to work with and very easy to distort the shape.
To answer some of our questions about how to cut the lace, I spent an hour in front of the mirror in my partially completed dress with Chris draping a sample lace piece. The first option was to use the scalloped edge as the neckline, positioning the large design just above the scallops down my centre front and using the curved edge of the lace as the cap sleeves. It looked lovely but the neckline was very high and moving the scalloped edge down looked odd. In addition, the pattern would be upside down to the skirt which I wasn't too keen on.

After a quick cup of tea to refill our ideas box, we turned the lace and added the scalloped edge to the waistline. In a magical moment we had found how to position the lace to allow the full design to shine. It did actually twinkle as the sequins caught the sunlight of the fading afternoon light. The tulle base had just enough stretch to allow us to maintain the fitted look across the bust although darts would need to be added at the back as I am too hollow for the stretch to cover it smoothly. In order to have the delightful scalloped edges on the neckline and cap sleeves, I would have to stitch them on later.
Creating this bodice took longer than any other part of the dress. It required a lot of concentration, careful handling of the lace so not to stretch it and so much hand stitching. Once cut, all seam lines (excluding the scallops) were stabilised with a narrow piece of silk organza selvedge and all stitching lines marked. I found that I had to complete this step in short bursts to ensure that I didn't get frustrated at the slow progress and accidentally distort the shape.

Neckline whip stitched into place before adding the scalloped edge

Again, I basted the bodice together including the darts before heading back to Chris' for another fitting. At the fitting, we added darts to the front to pull the lace in tightly to keep the fitted look. My fears of distorting the shape had come true and we had to ease the neckline slightly to a strip of organza 2cm shorter than originally cut. We let out the left side seam to ensure it matched up perfectly with the silk bodice side seam. The final alteration was to take in the back of arms by 1cm to give a more balanced look.

I used a narrow zigzag for the side seams and darts. To finish the seams and neckline, I graded the organza and folded over the lace before whip stitching it into place.

So far, the bodice and skirt (details coming in the next post) had been kind and didn't require applique seams. That changed with the shoulder seams. Wanting to make the most of the lace design as well as needing to avoid bulk, I carefully trimmed around one flower on each side before laying them over the seam. The seams were machine stitched either side and the flowers carefully secured into place with tiny hand stitches. I relied heavily on Bridal Couture to ensure I was doing this correctly.

Shoulder seam before applique seam

Shoulder seam after adding applique seam and finishing seam
Stitching the shoulder flowers was a good introduction to the hard work ahead to finish the sleeves and the neckline. Each one needed a scalloped edge added and the width of them was rather narrow. This was mainly for comfort as too much depth would have restricted movement and felt constricting. The other considerations were not covering too much of the design in the bodice and having the flexibility in the edges to allow for a smooth line. To add the scalloped edges, I placed the dress on my dress form and carefully positioned where the larger flowers should go, ensuring no more bulk was added at the shoulders and basted it firmly into place.

Lots of snips into the tulle later and more grading towards to the embroidered thread to ensure it laid flat and looked like a natural part of the dress, I began the slow and somewhat tedious work of hand stitching. Again, distorting the shape of the neckline was my main concern and I chose to stitch the lace while the dress was on the dummy. This helped keep the fabric in place but it took a lot of odd positions for my arms to keep the smooth line!

At this stage, the bodice was still completely unattached to the dress. In order to secure it, the side seams were tacked onto the side seams of the silk satin bodice and anchored at the waistline in key places underneath the larger flowers. The back was left free to allow for the details to be added and prevent any ruffling.
If you're still with me, thank you so much for sticking around! We have one final construction post focusing on the skirt and my favourite part of the dress - the centre back details before the full reveal.